Thursday, December 17, 2015

last minute super inexpensive gifts to make with paper

Here are a few last minute gifts to make that will only cost pennies. They are all made with card stock, a printer and a few internet searches. 
A 250 sheet package of card stock is less than $15 at the local business store and one package makes a lot of gifts. A small sampling is listed here.
  1. Paper dolls. By searching 'free paper doll printable' I found retro sets as well as new. By printing on card stock the dolls have more durability. Glue the doll itself to cardboard from an old cereal or other piece of cardboard to make them strong enough to stand. Each doll takes 1 sheet and clothes take 1 sheet per outfit theme.
  2. Paper vehicles. The searches 'free paper airplane printable' and 'free paper car printable' gave models of all types of vehicles with construction from simple to complicated. If a certain plane, train or auto is needed add the name to the search. There are a lot of models geared for the adult as well as ones for the younger set. Each vehicle takes 1 sheet on the average.
  3. Board games. Search was for 'free board game printable'. A lot of the games have boards and pieces but some are just boards. The games range from monopoly style to chutes and ladders style. 2 sheets are needed for most boards and another for pieces.
  4. Coloring pages. Search 'coloring pages free printable.' If you want a certain animal or subject include that in the search string. The Internet has a huge array of printable pages for coloring that will work for preschool to the Teen gamer. 1 sheet is needed for each page.
  5. Note cards. The search is for 'printable note cards free' If a theme is desired include that in the search. Note card set-ups can be found for word and other card programs. Personalized note cards with Initials or themed pictures of all types are available. 1 sheet makes 2 note cards.
General searches like 'free paper toy templates' and 'free paper gift instructions' yields usable sites as well with items ranging from models of the Eiffel Tower to paper flowers and origami.
Each gift can be upgraded by adding crayons, stickers, folders or other items to the package.


Wednesday, December 16, 2015

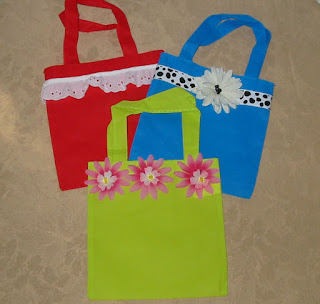
Turn plain tote bags into adorable gift bags or purses

Trim, ribbon or flowers are sewn or glued on turning a plain bag into an adorable gift bag or tote.

The bags came two to a package and were purchased at a dollar store. This size measures 12 inches by 12 inches not counting the handle.


To make a flat bottom turn the bag inside out and sew across the diagonal in each corner (where I have the pin)


They should look like this in the inside.


This is how they look on the outside.


These little bags are simple, inexpensive but with great Wow factor so make them by the dozen and share the joy.

Tuesday, December 15, 2015

simple bracelets from tubing

Easy, inexpensive and fast these bracelets are great for adding the perfect touch to a hard to match outfit or as gifts. 

Monday, November 30, 2015

3 Vases From Recycled Material

Cut down on cost and storage with these holiday vases that disappear into the recycle bin or trash after the holidays.

The flowers and foliage in my vases are fake but real flowers can be used just by putting a jar or other container inside the 'vase'.

Coffee Container Vase

I put white copy paper around the container so the print won't show through.

Once the paper is on it is time to upgrade the container to a vase.

Tissue paper, thin wrapping paper or fabric work to cover the container. Bring up a corner and then work around the container to gather cover evenly.

Tuck ends into the container and tape in place. Double faced tape works very well for this step.

Arrange the flowers and Voila! A vase out of a coffee container.


Larger and Taller Arrangements Get an Oatmeal Box For a Vase.

Pick out wrapping paper or other wide paper. Roll container to cover it. Use double faced tape or glue to close seam. HINT – fold raw edge in so the seam is neat.

Tuck paper into container on the top and over the edge of the bottom. Tape the paper on the bottom and in the container.
Add any embellishments desired.

The vase is ready for the arrangement. HINT – If the floral arrangement is top heavy put rocks or other heavy object in the bottom of the container before adding the floral pieces.

Toilet paper roll vase

Cover 7 toilet paper rolls in your choice of wrapping paper. If there is a figure or design make sure all the rolls match. EXAMPLE - the Santa Claus figures all match giving a neat appearance.

Place the rolls in a bunch with one in the middle and six on the outside

Paper clip the rolls together to form one unit.

Add flowers or stems in each of the 7 rolls for a full arrangement.

Other ideas

Tie a ribbon around the top of a jar to cover the ridges for the screw on cap. Fill with colored water and add any floral pieces desired.

Cracker boxes or other square boxes can be cut down and covered with wrapping paper or construction paper.

Poster board can be cut into strips and woven together for a basket.

Any candy dish or bowl can be put to use as a decorative piece for flowers, ornaments or pine cones. Potpourri with a holiday sent can be used as well.


Wednesday, November 18, 2015

How to make an angel from copy paper and an egg

We will be adding ideas for inexpensive gifts and decorations as we get them ready. 
First craft is creating an angel out of copy paper. and an egg. 

1.  To create this angel you need an eggshell. Take an egg and carefully create a hole at each end. With a strong breath blow into the egg so the whites and yolk come out the other hole. Rinse the egg but remember to treat it gently at all times for it is fragile.
2.  Once the eggshell is dry draw a face with markers, colored pencils or what have you and then put a piece of wire or pipe cleaner in the bottom hole. This wire will be the connection between the egg and the cone.
3. For hair cut strips of paper and curl them with a pencil. Glue then to the egg making sure to cover the top hole.
4.   With copy paper create a cone and cut out wings and arms. I made the cone with one piece of copy paper and trim the base so the cone measures 8 inches high. The wings and arms are cut by folding a piece of paper in half so that both wings and both arms are the same. The wings measure 7 inches across at the widest when the wings are unfolded. They measure 7 inches long from top to tip. The arms measure 7 ½ inches long unfolded and are 2 inches wide at the end of the sleeves.
5.  Glue the arms to the wings and then to the cone. Put the pipe cleaner or wire in the top of the cone and set the head in the desired position. Glue the ends of the sleeves together so it looks as though the angel is folding her hands. The halo is a circle of paper glued to the back of the angel's head.
6.  Other ideas. Add glitter to the halo and wings. Use blue or another color paper for her dress and yellow. Brown or black paper for her hair. Use yarn for her hair, ribbon for her halo and cover the cone in printed holiday paper.


Saturday, October 31, 2015

easy up grade for battery operated tea lights

These covers are very easy to make and can create a beautiful holiday display with inexpensive battery operated tea lights.

Monday, October 12, 2015

pumpkin template

This is how we made the original pumpkins that we turned into cartoons for the Halloween animation. 

Tuesday, September 15, 2015

easy to make masks free pdf pattern

Making costumes for Halloween is the fun leading up to the big day. These masks are easy to make with foamie sheets or poster board. With a little creativity, glue and miscellaneous bits and pieces a very original mask can be made that guarantees the wearer will be one of a kind.


Print out our free PDF template for your mask found here. Trace it onto the foam sheet. If using a black foam craft sheet a piece chalk works great for tracing.
Cut out the mask and mark it for a stick, ribbon or elastic.
For a stick punch two holes in one side of the mask. Decide if the mask is being created for a left or right handed person and punch holes to accommodate the hand that will hold the mask. 
 
For ribbon cut two pieces long enough to go around the head with extra to tie. Tie a bow or knot in one end of each piece. Thread the untied end through the mask so the bow shows on the front. The ribbon in then tied behind the head to hold in place.
Elastic cord is done like the ribbon with a knot at the front. Measure the head and then subtract an inch or two, so the elastic cord is semi-stretched when on the wearer. If the cord is thin use a needle to run it through the mask instead of punching a hole. 

 
To use a stick decorate the stick with paper or feathers to make a fancy end. This one is done with paper cut and then curled and taped to the end of the stick.

Once the end is decorated the whole stick is wrapped in ribbon. Glue helps keep the ribbon in place.

 
Other ideas and hints
  1. For a room mother or scout leader the masks can be printed out on card stock and then each child can decorate their own.
  2. For ready to wear masks decorate the mask in a photo or graphic program on the computer and then print on card stock.
  3. To cut out multiple masks at one time clamp the foam craft sheets together with bag clips, large paper clamp clip or clothes pins and cut with a craft or utility knife.
  4. A regular paper punch works on the foam sheets but they can catch so remove the punch carefully. 


Wednesday, September 9, 2015

Easy, no sew, costume hats

Doug, Viper, Elroy and I love Halloween.   Because we love to make things we always make our costumes with paper or other easy to find recyclable pieces. 
All of the hats are created with a sheet of poster board or by taping construction paper together to make the size needed if poster board isn't available.
Each hat can be adorned with buckles, feathers, hat bands and glitter to upgrade it from just a paper hat to a real costume piece. 

Basic directions

  1. measure the child's head to get the inside measurement for the hat
  2. measure out from the hole for the head how many inches wide the brim should be
  3. Make sure tabs are cut evenly around the inside of the brim to make attaching the crown easier and more secure. Draw the circle of the size for the head hole so you can determine how deep to cut the tabs. If you are worried about cutting them freestyle draw them first so you have a line to follow.
  4. The top of the hat will also have tabs but don't need to be as many to hold it to the crown.
  5. The crown height is important for the style of the hat. The cowboy and knight pictured have 4 inch high crowns.


The princess and the Knight

The princess hat is super simple. Roll the poster board into a cone shape and trim the bottom. The scarf or ribbon streamer is created by pulling the streamer through the top of the cone and tied in a knot of the inside of the hat so it won't fall out.

The knight's helmet is a cylinder with a top and the front cut out for the face. A visor is created by cutting the sides of the 'visor' and then folding it up toward the top. Chicken feathers are added by punching a hole it the top and inserting the feathers. They are held in place by placing a rubber band around the feathers which holds them together and keeps them from being pulled out of the hole. Tape the rubber band end to the inside of the hat.

Brimmed hats

All of these hats are created the same way with just minor differences. Most differences is just the style of the brim but the stove pipe hat and the pilgrim/leprechaun hat have a difference in the crown as well. The stovepipe has a crown height of 8 inches. The pilgrim/leprechaun has a crown of 6 inches that is wider at the bottom than. The bottom is approx. 3 inches wider that the top.

Other ideas to complete the costume


  1. Cowboys – plaid shirt and jeans
  2. Princess – party dress with lots costume jewelry
  3. Musketeer and Knight – take out the side seams of a pillowcase, cut a hole for the head in the top of the case and draw the fleur-de-lis for the Musketeer or a royal shield for the knight on the front.
  4. A leprechaun can wear a green t-shirt under a suit coat. 
     
Come back later and I will tell you how we can create a mask or two.